Install Ubuntu 24.04 Desktop on an Existing Encrypted LVM Partition
Starting with Ubuntu 24.04, the new installer no longer recognizes encrypted or logical (LVM) volumes. During manual installation, the option to select an LVM volume as a target is missing. This is a frustrating change for users who rely on full-disk encryption or want to reuse existing partitions. Other derivatives, such as Kubuntu, Lubuntu, and Ubuntu Unity use the Calamares installer and are therefore not affected.
In this tutorial, we’ll walk through how to install Ubuntu 24.04 Desktop on an existing encrypted LVM partition using a custom autoinstall.yaml file.
This method makes it possible to:
- Reuse existing partitions without wiping the disk
- Set up or maintain full-disk encryption with LUKS and LVM
- Work around the missing installer support for encrypted LVM setups
The steps described here have been tested on Ubuntu 24.04 and Xubuntu 24.04, and should work reliably for similar setups.
Prerequisites
- Ubuntu 24.04 live installer (e.g. create a bootable USB stick)
Partitions
This section describes the disk partition layout that will be used in the following sections when installing Ubuntu 24.04. The setup assumes a UEFI boot environment with an EFI System Partition (ESP), a separate unencrypted boot partition, and an encrypted LVM volume for the root filesystem.
The system partition is encrypted with LUKS and acts as a container for LVM volumes (e.g., root, swap, home).
The EFI and boot partitions remain unencrypted to allow the firmware and bootloader to initialize properly.
While this guide focuses on reusing an existing encrypted LVM layout, this section also briefly outlines the partitioning scheme for completeness. Detailed steps for creating or encrypting partitions are covered later.
Replace /dev/sdX with your actual device name in the commands below.
A device (e.g., /dev/sdX) is not the same as a partition (e.g., /dev/sdX1).
Mixing them up can result in irreversible data loss.
-
EFI System Partition (
/dev/sdX1)- Filesystem: FAT32 (vfat)
- Size: 512 MB
- Flags:
boot,esp - Unencrypted
-
Boot Partition (
/dev/sdX2)- Filesystem: ext4
- Size: 4 GB
- Used to store kernel and initramfs images
- Unencrypted
-
System Partition (
/dev/sdX3)- Filesystem: unformatted (will be initialized as LUKS)
- Size: remaining disk space
- Encrypted, contains the LVM physical volume
Create new Partitions
In this section, we will set up a new partition layout on the primary disk. Before proceeding, ensure you have a complete backup of any important data, as this process will wipe the disk entirely. Verify that you are working on the correct device.
Creating a new partition table will permanently erase all data on the selected disk. Double-check the device before proceeding.
Steps:
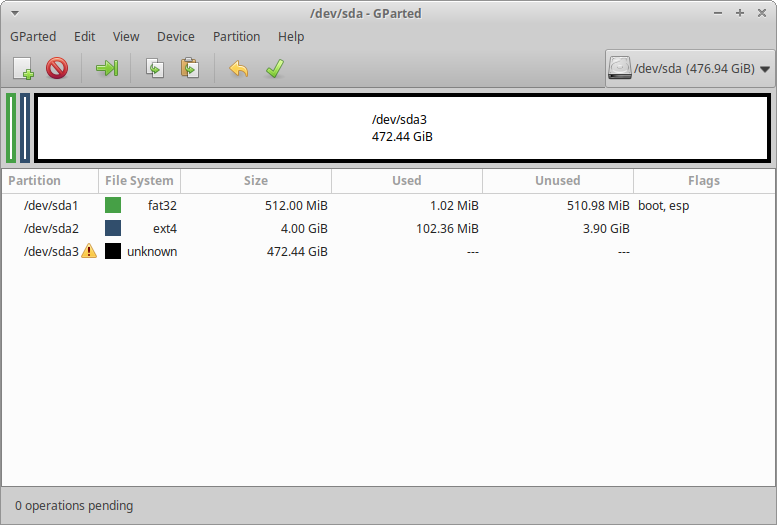
- Boot into the Ubuntu 24.04 live environment and open GParted.
- Select the primary disk (e.g.,
/dev/sdX) from the dropdown menu in the top right.- Verify you selected the correct disk, especially on systems with multiple drives.
- From the menu, go to Device → Create Partition Table and choose gpt.
- GPT is required for UEFI boot.
- Create the three partitions as outlined earlier (right-click → New):
/dev/sdX1— EFI system partition (ESP)/dev/sdX2— boot partition/dev/sdX3— system partition
- Once all partitions are defined, click Edit → Apply All Operations.
- After creation, verify the EFI partition flags:
- Right-click
/dev/sdX1→ Manage Flags, ensure bothbootandespare set. - Without these flags, the installer will fail to detect UEFI boot support.
- Right-click
The final result should look similar to this example:
Encrypt System Partition
In this step we will configure full-disk encryption for the system partition using LUKS (Linux Unified Key Setup). This ensures that all data stored on the root filesystem and swap space is encrypted at rest. The partition will only become accessible after entering the decryption passphrase at boot.
Disk encryption inevitably affects read and write performance.
The choice of cipher and key size should balance security requirements with the performance of your hardware (especially if no hardware acceleration for AES is available).
Recommended options include:
aes-xts-plain64with a 512-bit key (AES-XTS-512, strong security, moderate performance)aes-xts-plain64with a 256-bit key (AES-XTS-256, good balance for most systems)serpent-xts-plain64with a 512-bit key (alternative cipher for those preferring non-AES)
Encryption is only as strong as the passphrase you choose. Select a long, unique password that cannot be easily guessed.
Create and open the encrypted partition
We encrypt the third partition (/dev/sdX3) and assign it the mapping name lukslvm.
The mapping name can be chosen freely, but must be used consistently throughout the setup.
cryptsetup luksFormat -c aes-xts-plain64 -s 512 -h sha512 /dev/sdX3
cryptsetup luksOpen /dev/sdX3 lukslvm
At this point, the encrypted virtual block device is available under /dev/mapper/lukslvm, and can be used like a physical volume for LVM.
Set up LVM inside the encrypted container
Next, create an LVM physical volume and volume group on top of the unlocked device:
pvcreate /dev/mapper/lukslvm
vgcreate vgubuntu /dev/mapper/lukslvm
Inside this volume group, we define the logical volumes for swap and root. In the simplest case, two volumes are sufficient:
- swap, sized according to system needs (here: 8 GB, a reasonable default for modern systems)
- root, occupies the remaining free space
lvcreate -L 8G -n swap vgubuntu
lvcreate -l 100%FREE -n root vgubuntu
While the disk is unlocked, the new logical volumes are accessible as virtual devices under /dev/mapper/.
By default, these appear as /dev/mapper/vgubuntu-swap and /dev/mapper/vgubuntu-root, which typically correspond to /dev/dm-1 and /dev/dm-2.
This completes the creation of an encrypted LVM environment with one swap volume and one root volume.
More complex layouts (e.g., dedicated /home or /var volumes) can be created if needed, but are not strictly required for a standard Ubuntu installation.
Installation
This section describes how to install Ubuntu 24.04 Desktop onto an encrypted LVM partition. We assume that the disk has already been prepared as outlined in the previous sections (EFI, boot, and encrypted system partition with LVM).
Since the new Ubuntu Desktop installer does not provide support for encrypted LVM volumes through its graphical interface, we will rely on the autoinstall mechanism.
Autoinstall uses a YAML configuration file (autoinstall.yaml) that relies on the Curtin backend (API v1).
Curtin fully supports operations such as LUKS encryption and LVM volume management, allowing us to bypass the limitations of the GUI installer.
The installation process consists of two main tasks:
- Applying a patch to the installer (required due to a bug when handling preserved encrypted partitions).
- Supplying a custom
autoinstall.yamlfile that describes the partition layout and installation parameters.
Patch Installer
Due to a known bug in Curtin, it is currently not possible to install Ubuntu 24.04 if an encrypted partition (dm_crypt) is present and the preserve: true option is used.
When this condition occurs, the installer always fails.
To work around this issue, the installer must be patched. The source code for the patch is available on GitHub and can be forked or built directly using GitHub workflows:
A prebuilt patched snap package of the ubuntu-desktop-bootstrap installer is available on the
release page.
The --dangerous flag is required because the package is unsigned. This is expected and safe in this context.
Install the patched package with:
sudo snap install ubuntu-desktop-bootstrap_0+git.819576f2e_amd64.snap --classic --dangerous
Create Autoinstaller Config
Ubuntu’s autoinstaller provides a mechanism to automate installation through a YAML configuration file, describing partitions, formatting, encryption, and mounts without relying on the GUI. Here, we define a setup with three key partitions: EFI, boot, and an encrypted system partition containing LVM.
Before writing the config, gather the exact disk layout and partition sizes with:
lsblk --noheadings --bytes --pairs --output=NAME,SIZE,FSTYPE,TYPE,MOUNTPOINT,UUID /dev/sdX
The reported SIZE values should replace the <SIZE> placeholders in the YAML.
Using byte sizes avoids rounding issues that could otherwise cause the installer to fail when matching partitions.
Full documentation for the autoinstall configuration can be found here:
The following subsections provide a detailed breakdown of each configuration element, with two complete working examples at the end.
Base structure
The root of the configuration begins with the autoinstall key, which must declare version: 1.
This section defines global parameters that guide how the installer behaves and which prompts remain interactive.
interactive-sections: specifies which parts of the installer require manual input. The minimal required value isidentity(for username, password, and hostname).source: selects the Ubuntu image variant to install. In this example,ubuntu-desktopis used. Alternative variants such asubuntu-servercan be specified. A complete list is available in the autoinstall reference.
autoinstall:
  version: 1
  interactive-sections:
    - 'identity'
  source:
    id: ubuntu-desktop
...
Disk definition
The storage section defines how the installer handles disks and partitions using a sequence of Curtin actions.
Each entry in the config list is an action applied to a block device, such as creating a partition, formatting it, or mounting it.
The sequence begins by declaring the primary disk:
...
  storage:
    version: 1
    swap:
      size: 0
    config:
      - id: disk-main
        type: disk
        path: /dev/sdX
        ptable: gpt
        preserve: true
        grub_device: false
...
Once a disk action is declared, all partitions on that disk must also be included as actions with preserve: true.
Any partition not listed is assumed to be unused and may be modified or deleted by Curtin.
Notes:
version: 1enables use of advanced actions such aslvm_volgroupanddm_cryptptable: gptconfigures the disk with a GUID Partition Table, required for UEFI bootpreserve: truereuse the existing storage device
Boot partitions
The boot process relies on two dedicated partitions:
- EFI System Partition (ESP), which may be shared with an existing system (e.g., Windows)
- Linux boot partition, dedicated to storing the kernel and related files
Both partitions are defined through three Curtin actions: partition, format, and mount.
EFI system partition:
...
      - id: partition-1
        type: partition
        path: /dev/sdX1
        device: disk-main
        size: <SIZE>
        flag: boot
        number: 1
        preserve: true
        grub_device: true

      - id: format-partition-1
        type: format
        volume: partition-1
        fstype: vfat
        preserve: true

      - id: mount-boot-efi
        type: mount
        path: /boot/efi
        device: format-partition-1
...
Boot partition:
...
      - id: partition-2
        type: partition
        path: /dev/sdX2
        device: disk-main
        size: <SIZE>
        flag: linux
        number: 2
        preserve: true
        wipe: superblock
        grub_device: false

      - id: format-partition-2
        type: format
        volume: partition-2
        fstype: ext4
        preserve: false

      - id: mount-boot
        type: mount
        path: /boot
        device: format-partition-2
...
Notes:
grub_device: truemust be set on the EFI system partition (ESP), otherwise GRUB will not be installedpreserve: truereuses the existing partition layout without recreating itwipe: superblockfor/dev/sdX2, ensures a clean (reformatted) filesystem while keeping the partition itself intact- The ESP must NOT be wiped or formatted, as it may already contain other bootloaders (e.g., Windows)
Encrypted system partition
The third partition is reserved for the encrypted system volume. It is first declared as a standard partition, then wrapped with a dm_crypt mapping. No Curtin format or mount action is needed, since the encrypted device will be managed through LVM.
...
      - id: partition-3
        type: partition
        path: /dev/sdX3
        device: disk-main
        size: <SIZE>
        flag: linux
        number: 3
        preserve: true
        grub_device: false

      - id: dmcrypt-lvm
        type: dm_crypt
        path: /dev/sdX3
        volume: partition-3
        dm_name: lukslvm
        preserve: true
...
Notes:
dm_namemust match the identifier used when unlocking the partition manually (lukslvm)preserve: truereuse the existing encrypted partition
LVM volume group and logical volumes
Once the encrypted partition is unlocked through dm_crypt, it becomes available as a virtual device that can host an LVM volume group. This setup uses a single volume group (vgubuntu) containing two logical volumes:
- a swap volume, used as a temporary overflow area for RAM
- a root volume, which contains the main Linux filesystem
Logical volumes are declared in Curtin with lvm_partition actions and must be followed by format and mount actions to make them usable.
...
      - id: lvm-volgroup-vgubuntu
        type: lvm_volgroup
        devices:
          - dmcrypt-lvm
        name: vgubuntu
        preserve: true

      - id: lvm-partition-swap
        type: lvm_partition
        path: /dev/dm-1
        volgroup: lvm-volgroup-vgubuntu
        size: <SIZE>
        name: swap
        preserve: true
        wipe: superblock

      - id: format-lvm-partition-swap
        type: format
        volume: lvm-partition-swap
        fstype: swap
        preserve: false

      - id: mount-swap
        type: mount
        path: ''
        device: format-lvm-partition-swap

      - id: lvm-partition-root
        type: lvm_partition
        path: /dev/dm-2
        volgroup: lvm-volgroup-vgubuntu
        size: <SIZE>
        name: root
        preserve: true
        wipe: superblock

      - id: format-lvm-partition-root
        type: format
        volume: lvm-partition-root
        fstype: ext4
        preserve: false

      - id: mount-root
        type: mount
        path: /
        device: format-lvm-partition-root
Notes:
preserve: truereuse the existing logical volumewipe: superblockensures a clean (reformatted) filesystem while keeping the logical volume itself intact
Optional: Identity configuration
The primary system identity can optionally be configured directly in the autoinstall.yaml, although it is often easier to use the GUI for this step.
An example configuration:
autoinstall:
  version: 1
  identity:
    realname: 'Ubuntu User'
    username: ubuntu
    password: '$6$wdAcoXrU039hKYPd$508Qvbe7ObUnxoj15DRCkzC3qO7edjH0VV7BPNRDYK4QR8ofJaEEF2heacn0QgD.f8pO8SNp83XNdWG6tocBM1'
    hostname: ubuntu
...
An encrypted password can be created with:
mkpasswd -m sha-512
Complete Examples
Template /dev/sda
autoinstall:
  version: 1
  interactive-sections:
    - 'identity'
  source:
    id: ubuntu-desktop
  storage:
    version: 1
    swap:
      size: 0
    config:
      - id: disk-main
        type: disk
        path: /dev/sda
        ptable: gpt
        preserve: true
        grub_device: false

      - id: partition-1
        type: partition
        path: /dev/sda1
        device: disk-main
        size: 536870912
        flag: boot
        number: 1
        preserve: true
        grub_device: true

      - id: partition-2
        type: partition
        path: /dev/sda2
        device: disk-main
        size: 4294967296
        flag: linux
        number: 2
        preserve: true
        wipe: superblock
        grub_device: false

      - id: partition-3
        type: partition
        path: /dev/sda3
        device: disk-main
        size: 507276951552
        flag: linux
        number: 3
        preserve: true
        grub_device: false

      - id: dmcrypt-lvm
        type: dm_crypt
        path: /dev/sda3
        volume: partition-3
        dm_name: lukslvm
        preserve: true

      - id: lvm-volgroup-vgubuntu
        type: lvm_volgroup
        devices:
          - dmcrypt-lvm
        name: vgubuntu
        preserve: true

      - id: lvm-partition-swap
        type: lvm_partition
        path: /dev/dm-1
        volgroup: lvm-volgroup-vgubuntu
        size: 8589934592
        name: swap
        preserve: true
        wipe: superblock

      - id: lvm-partition-root
        type: lvm_partition
        path: /dev/dm-2
        volgroup: lvm-volgroup-vgubuntu
        size: 498669191168
        name: root
        preserve: true
        wipe: superblock

      - id: format-partition-1
        type: format
        volume: partition-1
        fstype: vfat
        preserve: true

      - id: format-partition-2
        type: format
        volume: partition-2
        fstype: ext4
        preserve: false

      - id: format-lvm-partition-swap
        type: format
        volume: lvm-partition-swap
        fstype: swap
        preserve: false

      - id: format-lvm-partition-root
        type: format
        volume: lvm-partition-root
        fstype: ext4
        preserve: false

      - id: mount-swap
        type: mount
        path: ''
        device: format-lvm-partition-swap

      - id: mount-root
        type: mount
        path: /
        device: format-lvm-partition-root

      - id: mount-boot
        type: mount
        path: /boot
        device: format-partition-2

      - id: mount-boot-efi
        type: mount
        path: /boot/efi
        device: format-partition-1
Template /dev/nvme0n1
autoinstall:
  version: 1
  interactive-sections:
    - 'identity'
  source:
    id: ubuntu-desktop
  storage:
    version: 1
    swap:
      size: 0
    config:
      - id: disk-main
        type: disk
        path: /dev/nvme0n1
        ptable: gpt
        preserve: true
        grub_device: false

      - id: partition-1
        type: partition
        path: /dev/nvme0n1p1
        device: disk-main
        size: 536870912
        flag: boot
        number: 1
        preserve: true
        grub_device: true

      - id: partition-2
        type: partition
        path: /dev/nvme0n1p2
        device: disk-main
        size: 4194304000
        flag: linux
        number: 2
        preserve: true
        wipe: superblock
        grub_device: false

      - id: partition-3
        type: partition
        path: /dev/nvme0n1p3
        device: disk-main
        size: 1019476967424
        flag: linux
        number: 3
        preserve: true
        grub_device: false

      - id: dmcrypt-lvm
        type: dm_crypt
        path: /dev/nvme0n1p3
        volume: partition-3
        dm_name: lukslvm
        preserve: true

      - id: lvm-volgroup-vgubuntu
        type: lvm_volgroup
        devices:
          - dmcrypt-lvm
        name: vgubuntu
        preserve: true

      - id: lvm-partition-swap
        type: lvm_partition
        path: /dev/dm-1
        volgroup: lvm-volgroup-vgubuntu
        size: 8589934592
        name: swap
        preserve: true
        wipe: superblock

      - id: lvm-partition-root
        type: lvm_partition
        path: /dev/dm-2
        volgroup: lvm-volgroup-vgubuntu
        size: 1010869207040
        name: root
        preserve: true
        wipe: superblock

      - id: format-partition-1
        type: format
        volume: partition-1
        fstype: vfat
        preserve: true

      - id: format-partition-2
        type: format
        volume: partition-2
        fstype: ext4
        preserve: false

      - id: format-lvm-partition-swap
        type: format
        volume: lvm-partition-swap
        fstype: swap
        preserve: false

      - id: format-lvm-partition-root
        type: format
        volume: lvm-partition-root
        fstype: ext4
        preserve: false

      - id: mount-swap
        type: mount
        path: ''
        device: format-lvm-partition-swap

      - id: mount-root
        type: mount
        path: /
        device: format-lvm-partition-root

      - id: mount-boot-efi
        type: mount
        path: /boot/efi
        device: format-partition-1

      - id: mount-boot
        type: mount
        path: /boot
        device: format-partition-2
Run Installer Setup
Before starting the installer, review the final checklist to ensure everything is prepared:
Final Checklist:
- The installer has been patched
- GParted is closed (release all devices)
- The LUKS partition is unlocked (
lukslvm) - All partitions on the main disk, including LVM volumes, are unmounted (partitions with existing ext4 filesystem may be auto-mounted by the OS)
autoinstall.yamlis fully configured with updated partition sizes
Once the checklist is complete, start the installer from the desktop.
Follow the installation steps and load the autoinstall.yaml file when prompted for automated installation.
After the installer finishes, select "Continue Testing" to perform the remaining post-installation steps. These final tweaks ensure the encrypted partitions are automatically unlocked and mounted on boot.
System Configuration
After installation, a few additional steps are needed to ensure the system correctly unlocks the encrypted LUKS partition during boot.
All commands must be executed from within the same terminal session to ensure they apply to the installed system, not the live environment.
Open Terminal and Chroot
Begin by mounting the installed system and entering a chroot environment, which allows changes to be made as if you were logged directly into the new system:
mount /dev/mapper/vgubuntu-root /mnt
mount /dev/sdX2 /mnt/boot
mount /dev/sdX1 /mnt/boot/efi

mount -o rbind /dev /mnt/dev
mount -t proc /proc /mnt/proc
mount -t sysfs /sys /mnt/sys

cp /etc/resolv.conf /mnt/etc/resolv.conf

chroot /mnt /bin/bash
The mounted environment now behaves like the installed system, so configurations can be safely applied.
Verify LUKS Configuration
The system must be able to identify and unlock the encrypted partition at boot.
First, obtain the UUID of the encrypted partition:
cryptsetup luksUUID /dev/sdX3
Example output:
a90d7e0e-932d-47ee-8a27-b9f65a906750
Next, open /etc/crypttab and confirm that it contains an entry referencing the UUID.
It should look like this (replace <VOLUME_ID> with the actual UUID):
lukslvm UUID=<VOLUME_ID> none luks
Example:
lukslvm UUID=a90d7e0e-932d-47ee-8a27-b9f65a906750 none luks
Update Kernel Initramfs
Next, regenerate the initramfs so the boot process includes support for unlocking the encrypted partition:
update-initramfs -u -k all
This step is critical. Skipping it may result in a system that cannot boot.
Finalize
Finally, exit the chroot, unmount all filesystems in reverse order, deactivate swap, and restart.
exit
sync

umount /mnt/sys
umount /mnt/proc
umount /mnt/boot/efi
umount /mnt/boot

swapoff -a

reboot
After reboot, the system should prompt for the LUKS passphrase and then continue to boot into the new Ubuntu 24.04 Desktop environment.
Change Encryption Password
ALWAYS add and test the new password first! It's possible to get locked out.
Add a new password:
cryptsetup luksAddKey /dev/sdX3
Remove an existing password:
cryptsetup luksRemoveKey /dev/sdX3
Troubleshooting
If something goes wrong during the installation, checking the logs is the first step.
Installer logs are stored under /var/log/installer in the live session. The most relevant files are:
curtin-install.log(contains detailed information about partitioning, filesystem creation, and package installation)subiquity-server-debug.log(provides debug output from the Subiquity installer, the frontend driving Curtin)
If the installer encounters a fatal error, it usually cannot recover to a clean state. In practice, it is often faster to reboot the system and restart the installation rather than trying to continue in the same session.